Angular2 project structure
Few posts ago I showed how to create new Angular2 project using Angular CLI. Let’s take a look at the project structure. Here we have app folder which contains few items.
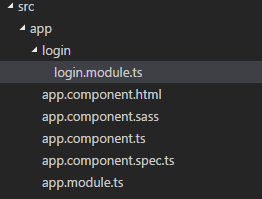
Look at the diagram below to better understand this structure.
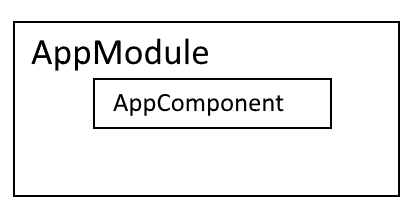
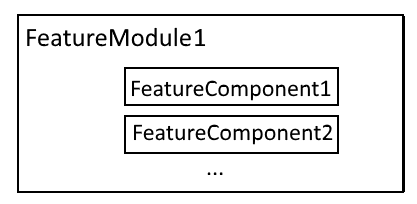
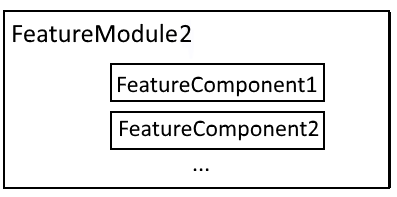
By default we have AppModule and AppComponent which is inside AppModule. This is how Angular2 project structure looks. We can have more components in one module and more modules with components of course.
Take a look into code. This is app.module class. It contains few core imports that come from angular library itself. There is also import of app.component class that has to be loaded. Beside it this class is empty for now.
|
1 2 3 4 5 6 7 8 9 10 11 12 13 14 15 16 17 18 19 20 |
import { BrowserModule } from '@angular/platform-browser'; import { NgModule } from '@angular/core'; import { FormsModule } from '@angular/forms'; import { HttpModule } from '@angular/http'; import { AppComponent } from './app.component'; @NgModule({ declarations: [ AppComponent ], imports: [ BrowserModule, FormsModule, HttpModule ], providers: [], bootstrap: [AppComponent] }) export class AppModule { } |
Look at the app.component class. It imports angular/core only, but it has another interesting thing inside component. There is selector ‚app-root’ which will be used in index.html to display component interior, templateUrl which is link to html file with view for this component, styleUrls which is link to css file for our view. Inside class AppComponent we have title – ‚app works!’ which is visible when you run application.
|
1 2 3 4 5 6 7 8 9 10 |
import { Component } from '@angular/core'; @Component({ selector: 'app-root', templateUrl: './app.component.html', styleUrls: ['./app.component.css'] }) export class AppComponent { title = 'app works!'; } |
Changing css to sass
Ok, we have css, but what if I want to have sass – css with super powers 😀 Sass is CSS pre-processor and allows you use variables, nested rules and more. It allows to create stylesheets faster. To change css to sass, first we need to download sass with npm
|
1 |
npm install node-sass --save-dev |
then set default extensions in our project
|
1 |
ng set defaults.styleExt sass |
then we need to change styles from .css to .sass in .angular-cli.json file
|
1 2 3 |
"styles": [ "styles.sass" ], |
and rename file from app.component.css to app.component.sass and rename another file from styles.css to styles.sass. In addition there’s one modification needed in app.component.ts file. StyleUrls should refer to sass file, not css file.
|
1 |
styleUrls: ['./app.component.sass'] |
ok project supports sass files now.
Let’s implement something in our project. As I mentiond before about modules and components, every module should be created for one feature.
Using CLI
I want to start from implementing login module, so let’s create module using CLI.
It is so simple. Just type in powershell command
|
1 |
ng g module login |
this command will create new module file in folder. Awesome! You don’t need to know best practices for organising your project, CLI does it for you.
The same situation is when we want to add component or service. Try it.
|
1 2 |
ng g component login ng g service login |
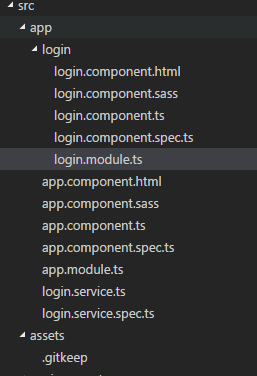
After executing these commands app folder looks like this. I created login.service, because it will be a part responsible for communicating with WebApi. Login.component will use this service. Unfortunately login.service is not in login folder. I want to have everything connected with login in one folder for better organisation so I will move it.
In official angular cli’s readme , we can see all possibillities that we have to generate files.
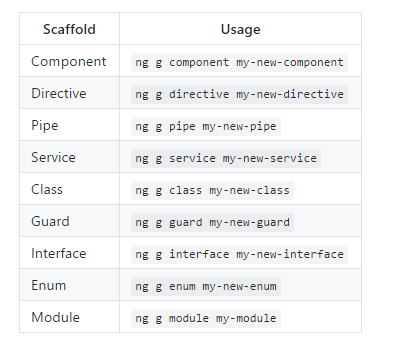
You can read more here.
Ok, project is ready to start implementation of login component. Maybe I will describe in next post how to connect WebApi. We will see 😉