In the previous post I showed how to implement cookie authentication in ASP.NET Core Web Api, this time I want to show you how to implement token authentication using JWT token. I strongly recommend you to read my previous post about cookie authentication, because it will be simplier to understand, besides source code showed below have some parts described in the previous post.
JWT structure
JWT stands for JSON Web Token. It is small, self-contained JSON. It contains credentials, claims and other information.
JWT consist of header, payload and signature.
Header contains algorithm for JWT and type of token.
|
1 2 3 4 |
{ "alg": "HS256", "typ": "JWT" } |
Payload contains information that the server can use, e.g. user name, e-mail.
|
1 2 3 4 |
{ "sub": "abcd", "name": "test" } |
Signature is a secret key generated by server.
The goal is to send token to a client and the client will send it with every request back to the server to guarantee it’s rights. All information in token is encoded in Base64.
Here is a sample of encoded token
|
1 |
eyJhbGciOiJIUzI1NiIsInR5cCI6IkpXVCJ9.eyJzdWIiOiIxMjM0NTY3ODkwIiwibmFtZSI6IkpvaG4gRG9lIiwiYWRtaW4iOnRydWV9.TJVA95OrM7E2cBab30RMHrHDcEfxjoYZgeFONFh7HgQ |
Useful web page for decoding JWT tokens is https://jwt.io/. I recommend you to check it.
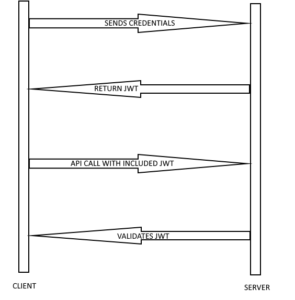
To better understand token authentication, take a look at the image below.
Client sends credentials, server validates them and returns signed JWT token
to be able to validate it later. Client have to include untouched JWT with every call. It can decode header and payload, but not signature. Only server can decode signature, because the secret is never shared.
Implementation
We know theory, now it’s time to look into code.
Let’s implement method in controller responsible for generating token, but first it should validate user credentials. In the previous post I used SignInManager class for signin, but this time we don’t want this, because it will generate a cookie. We just want to validate user credentials without a cookie. We can use for it PasswordHasher class. I want to have cleaner code, so I added method for validation in UserService class and UserService is used in LoginController. Here is my UserService with added VerifyHashedPassword method that uses IPasswordHasher
|
1 2 3 4 5 6 7 8 9 10 11 12 13 14 15 16 17 18 19 20 21 22 23 24 25 26 27 28 29 30 31 32 33 |
public class UserService : IUserService { private UserManager<User> _userManager; private SignInManager<User> _signInManager; private IPasswordHasher<User> _passwordHasher; public UserService(ELPContext context, UserManager<User> userManager, SignInManager<User> signInManager, IPasswordHasher<User> hasher) { _userManager = userManager; _signInManager = signInManager; _passwordHasher = hasher; } public async Task<User> GetUserByUsername(string username) { return await _userManager.FindByNameAsync(username); } public async Task<IdentityResult> CreateUser(User user, string password) { return await _userManager.CreateAsync(user, password); } public PasswordVerificationResult VerifyHashedPassword(User user, string password) { return _passwordHasher.VerifyHashedPassword(user, user.PasswordHash, password); } public async Task<IList<Claim>> GetClaims(User user) { return await _userManager.GetClaimsAsync(user); } } |
As you can see here are additional methods: GetClaims and GetUserByUsername. GetClaims method will be used to get all information about user and GetUserByUsername finds user by username.
Next it’s time to use these methods in LoginController. Here it is, ready and working create token method.
|
1 2 3 4 5 6 7 8 9 10 11 12 13 14 15 16 17 18 19 20 21 22 23 24 25 26 27 28 29 30 31 32 33 34 35 36 37 38 39 40 41 42 43 44 45 46 47 |
[HttpPost("token")] public async Task<IActionResult> CreateToken([FromBody] UserDto userDto) { try { var user = await _userService.GetUserByUsername(userDto.Username); if (user != null) { if (_userService.VerifyHashedPassword(user, userDto.Password) == PasswordVerificationResult.Success) { var userClaims = await _userService.GetClaims(user); var claims = new[] { new Claim(JwtRegisteredClaimNames.Sub, user.UserName), new Claim(JwtRegisteredClaimNames.Jti, Guid.NewGuid().ToString()), new Claim(JwtRegisteredClaimNames.GivenName, user.FirstName), new Claim(JwtRegisteredClaimNames.FamilyName, user.LastName), new Claim(JwtRegisteredClaimNames.Email, user.Email) }.Union(userClaims); var key = new SymmetricSecurityKey(Encoding.UTF8.GetBytes("SuperSecretKey")); var creds = new SigningCredentials(key, SecurityAlgorithms.HmacSha256); var token = new JwtSecurityToken( issuer: "http://localhost:4200", audience: "http://localhost:4200", claims: claims, expires: DateTime.UtcNow.AddMinutes(15), signingCredentials: creds ); return Ok(new { token = new JwtSecurityTokenHandler().WriteToken(token), expiration = token.ValidTo }); } } } catch (Exception ex) { _logger.LogError(ex.Message); } return BadRequest("Failed to login"); } |
First we need to find user by username. If the user is found then we can verify password hash. If credentials are good we create the token (BTW we need to add package System.IdentityModel.Tokens.Jwt first).
Then we create claims for user with all necessary informations, key and credentials. Key used to create SymmetricSecurityKey shouldn’t be hardcoded like this. It’s good to move it to configuration file, but I don’t want to complicate this example. Next we create JwtSecurityToken. Issuer and audience is our website that will accept this token. Expires tells how long token is valid.
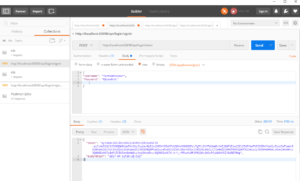
Now we can test it. Hit f5, open Postman and Send a request.
As you can see we get token in response to our request. It means we did it correctly.
Another thing to do is validating token send by a client.
In Startup class we need to use middleware for security token. Add few lines of code to Configuration method before UserMvc method call. We need to add also Microsoft.AspNetCore.Authentication.JwtBearer package.
|
1 2 3 4 5 6 7 8 9 10 11 12 13 |
app.UseJwtBearerAuthentication(new JwtBearerOptions() { AutomaticAuthenticate = true, AutomaticChallenge = true, TokenValidationParameters = new TokenValidationParameters() { ValidIssuer = "localhost:4200", ValidAudience = "localhost:4200", ValidateIssuerSigningKey = true, IssuerSigningKey = new SymmetricSecurityKey(Encoding.UTF8.GetBytes("SuperSecretKey")), ValidateLifetime = true } }); |
TokenValidationParameters should be the same like in create token method. These strings should be also moved to configuration file.
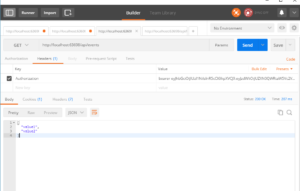
Let’s test it. For example I have EventsController that contains Get method which returns all events, but only for authorized users. If we try to get events we will get 401 Unauthorized error.
In this case we need to get token we generated before while testing create token method and put it in a request header with Key: Authorization and Value: bearer <token>. This time we should get status code 200. It means we have implemented token authentication in ASP.NET Core Web Api successfully.
If you want to take a look at the source code it is available in my Github repo.


One comment
Comments are closed.